Using bindings
The simplest of bindings include binding an object's property to a constant or to one of its own properties. Creating a more complex binding involves binding properties and attributes of one object to that of several different objects and adding several bindings.
You can create bindings after you add the Bindings property to an object. When creating bindings, note that:
- Only bindings to similar data types are valid. For example, you can bind only color to color, vector2 to vector2, and so on. The only exception are numerals which you can bind to strings.
- Binding takes the value of the last expression, whether it is an assignment, unary or binary operation, or just a constant value or variable itself.
- In bindings you can cast strings between the four fundamental types: integer, float, boolean, and string. Casts between integer, float, and boolean are implicit, and casts to and from string are explicit.
See Reference for bindings expressions.
When you write expressions for bindings in the Binding Argument Editor, the fastest and most accurate way to include objects and their properties in the expression is to drag and drop them from the Properties to the Expression editor in the Binding Argument Editor.
Note that the properties you bind override the properties set in the Properties.
Creating a simple binding
The simplest of bindings include binding an object's property to a constant or to one of its own properties.
To create a binding:
- In the Project create and select an object the properties of which you want to bind.
For example, create a Box object and select it.
- In the Properties add the Bindings property and click Add binding.
The Binding Argument Editor window opens.
- In the Binding Argument Editor set the following:
- Property to the property you want to bind.
For example, to bind any of the transformation attributes, select Transformation.
- Attribute to the property attribute.
For example, to bind only rotation along the y axis, select Rotation Y.
- In the Expression editor enter the expression.
For example:- To bind the rotation along the y axis to a constant, enter
10.
Click Save.
The object rotates 10 degrees around the y axis. - To bind the rotation along the y axis to a constant, the result of an operation, enter
MAX(23.2, 45.5).
Click Save.
The object rotates 45.5 degrees around the y axis. - To bind the rotation along the y axis to the location along the x axis of this same object, enter
{@./Transformation}.TranslationX
Click Save.
When you move the object along the x axis, the object rotates around the y axis.
Creating a more complex binding
A more complex binding involves binding properties of one object to that of several objects, or using several bindings. In this example, you create three sliders, each regulating one of the three light colors.
To create a more complex binding:
- Create three Slider objects and a Spot Light. See Using sliders.
- Select the Spot Light, in the Properties add the Bindings property and click Add binding.
The Binding Argument Editor window opens.
- In the Binding Argument Editor set:
- Property to Color and Attribute to Color R.
This binds to the property of the red color channel of the Spot Light. - In the Expression editor enter
{@../Slider_Red/SliderValue}
Click Save.
- Repeat the previous step for the Spot Light Color attributes Color G and Color B, and bind them to the Slider Value property of Slider objects Slider_Green and Slider_Blue.
Move the knobs of the sliders to change the color of the Spot Light.
Animating using bindings
You can use bindings for animations. One of the main advantages of using bindings to animate objects is that instead of time, you can use an object property.
To animate objects using bindings:
- Create an animation. See Animations.
- In the Project select the object you want to animate, in the Properties click Add Properties, and add the Bindings property.
- In the Properties click Add binding and set in the Binding Argument Editor:
- Property and Attribute to the property and attribute you want to animate with the expression in the binding. Note that you can animate only a single attribute. For example, you can animate Color R attribute of Emissive Color attribute, not the Whole property attribute.
- In the Expression editor enter the expression that animates the Property and Attribute.
For example, enter Animate({@./Transformation}.ScaleX, "Gradual increase") to use {@./Transformation}.ScaleX attribute to replace time and animation data with the resource ID Gradual increase that animates Color R attribute of the Emissive Color property. 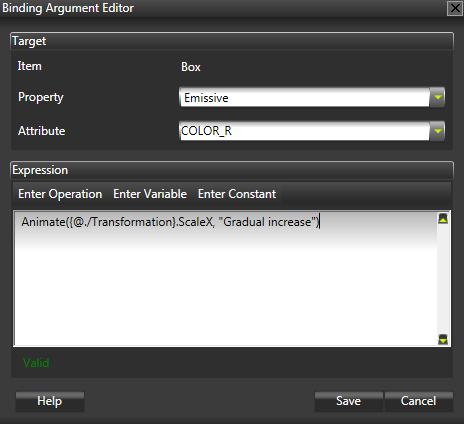
- Click Save.
Using bindings as an alternative to property inheritance
You can use bindings as an alternative to inheritance. You can use inheritance for defining a property in a parent so that it is inherited by a child object, but it works only when a property is inheritable and it is acceptable to have the property inherited by all child objects. See Property system.
To use bindings as an alternative to inheritance:
- Create a custom property and add it to the object to which you want to create a binding.
- Select the object to which you want to add a binding, in the Properties click Add Properties, and add the Bindings property.
- In the Properties click Add binding and set in the Binding Argument Editor:
- Property and Attribute to the property and attribute you want to bind.
- In the Expression editor enter the expression to include the custom property you created in the beginning of this procedure.
Click Save.
See also
Reference for bindings expressions
Bindings
Open topic with navigation